Pages

Thursday, September 20, 2012

Succulent Soup Cans

 So you have heard the rage about these right? 

They are only making a limited edition of these andy warhol tomato soup cans for target. I only bought 6. They have 4 different colors but I really didn't love the 4th color. So when I found them at our local target I knew I wanted to use them as planters. 

I mean cuteness overload right??? 

This was so easy and cheap!  Here are the simple steps: empty the soup (you can save the soup for later - yay lunch) and clean out the can (as carefully as you can so you don't soak the wrap), put some rocks in the bottom to help with drainage, fill it up with dirt and then pop the succulents in! Also I am going to mod podge the outside to help protect them from water. (thanks to shopgussied 's suggestion on instagram)

Here's the after! I am so happy with how cute they turned out!
I think I might need more.......what cute gifts???? EEK! Enjoy - 

I also saw this super cute idea on pinterest!
found here

Thursday, June 28, 2012

Weekly Pinterest DIY {twenty minute tote}


I finally thought I would try another DIY - and had this pinned on my DIY board for months and knew it would be a very easy project.  So I took my spin on it and loved it! Hope you enjoy.


source

 Now my take on it - Of course I had to add embellishments and I had to use felt - because it wouldn't be mine if it didn't have those two things :) I also thought I would add lace for the handles because I thought it added a nice little detail. Enjoy - this was a fun little project and so easy - things like this make me love the machine again. Now go and sew and show me what you make!


Monday, June 11, 2012

Weekly DIY {week nine}

So I had this thought in my head to make a stitched canvas. I SWEAR I saw it on Pinterest but went back and researched and couldn't find it anywhere. Maybe it was in my messed up head, maybe it was some mixed together (perhaps back to this DIY) - either way here is my weekly DIY! 

Ya'll try it! It was a fun project. I bought an oval canvas at Joanns and had all the embroidery thread and buttons at home. Next I wrote Ivey's name on it in my messy writing - then stitched over it. It was easy to stitch through the canvas. I used a simple backstitch to "copy" over the lettering. Then I decided (of course) that it needed embellishments. So I added little x's in some of my favorite colors and chose buttons that matched. I think this would be a fun project for any nursery or kids room! Have fun with it and be sure to let me know if you make one, I would love to see your finished canvas.


Thursday, May 31, 2012

Weekly Pinterest DIY {week seven/eight}

source
I saw this cutie pie DIY on pinterest a while back and thought it was adorable and a great use for embroidery thread. So I did the exact same thing when I found this cute racket at a local antique store. I loved the heart idea so I thought I would try my hand at the same design. This DIY stretched out over two weeks because I have been super busy - but this one also took the longest out of all the ones I have tried so far. But have fun with it, try initials, other shapes, etc. It was a fun little project that will add a fun detail to our house. 


Friday, May 18, 2012

Weekly Pinterest DIY {week six}

This week I decided to try an embroidered necklace. I have been seeing these everywhere and been wanting to try my hand on it. I finally ordered the blanks off etsy and decided to play around. The first two are the originals followed by my takes. I LOVE IT! I think this could be a great new project. I see a fun new adoption fundraiser!!
source
source
I have been trying to find a good use for these cute little buttons!

I love the size of this one - and I just had to use felt for my background :)

Saturday, May 12, 2012

Weekly Pinterest DIY {week five}

source
Better late than never right? Sorry this week got away from me but the other night I decided to try my hand at a printed piece with embellished details. I chose a lyric from a favorite song and added my own touch. I used printable fabric instead of canvas - but I would love to try to actually get some canvases printed and try my hand at the above image.

Have a great week!

Tuesday, May 1, 2012

Weekly Pinterest DIY {week four}

I remember friendship bracelets from back in the day and seeing all these pins on pinterest about the friendship bracelet trend has brought back so many memories. So I wanted to try my hand at a few simple ones.

 I made 5 bracelets - 3 wrapped bangles, one simple friendship bracelet and one braided bracelet. Here are a few with links to the tutorials.
source
source
source
My friend Sarah taught me the wrapped friendship bracelet, I thought I would try that same wrap on a bangle, and also just wrap a bangle. My friend Amy had one that was braided and I wanted to try my hand at that. I did one long braided piece and it fit three times around my wrist so I sewed them together with a big button. I added buttons to my 2 friendship bangles - I thought it was a great way to finish it and hide all the "knots". I love how these turned out and definitely want to make more - maybe this time I will actually make them for friends :)

So here is my take on the friendship bracelets:


 how much fun??? Now your turn!


Tuesday, April 24, 2012

Weekly Pinterest DIY {week three}

source


I have been wanting to embellish a cardigan for some time, I just haven't sat down and done it. Till last night - I kept seeing this cutie pic of a cardigan and I thought I would give it a try. This was VERY easy and a fun little embellishment for an old cardigan. I went with the exact shape they did, but I know I will be doing more with my own style! So much fun!

now for my finished piece....

before - a simple green cardigan

my after - thought I would do a mix of colors

a better view of my new sweater

Monday, April 16, 2012

Weekly Pinterest DIY {week two}

source


So here is my take on it - I just used fabric that was hanging out near my sewing machine and ribbon since I didn't have hem tape. Anyone who knows me knows this was a challenge for me since I HATE to use the machine. But this little project made me fall "a little" in love with my machine.  I have a feeling these are going to get addicting...I have already cut some pendants out of a vintage tablecloth to make another set!


 here they are in their current home in my kitchen. I should have added more between - they are a little too spread out for me but I can always make more!!


Tuesday, April 10, 2012

Weekly Pinterest DIY

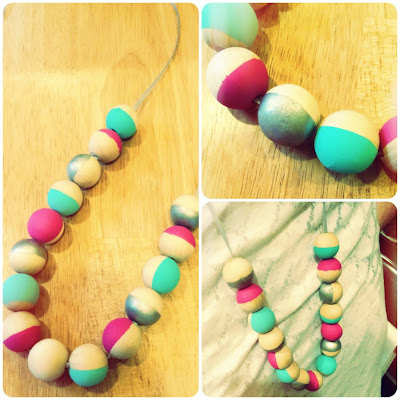
I am going to try a new weekly blog post about DIY's found on pinterest. I kept seeing painted wooden bead tutorials on pinterest and my friend Amy and I were shopping at Joann's and she was gathering items to make some so I thought I would try my hand at it. So here is the original post (which I admit looks WAY more polished then mine)
So here is my spin on it, I feel a little like a kid wearing it - like a craft project you did in sunday school but it is still cute - I did mine a little differently, pattern wise. Enjoy, I am excited about this new weekly challenge! Join with me!

Wednesday, March 21, 2012

Whimsy Wednesday {thewheatfield}

I love Katie Daisy's work.....and here are a few of my favorites from her shop. I am even thinking about using one of her butterflies as a tattoo :) Her works makes me happy, I hope it does the same for you.

Wednesday, February 22, 2012

Wednesday, February 15, 2012

Wednesday, February 8, 2012

Whimsy Wednesday {mylittlebuffalo}


I admit it I have been slacking on my blog......I had a nice break from "work" but in the meantime I was and am nursing a pinched nerve from the hard work I did over the holidays. I am mending...and making do....but it is a slow road to full recovery.

So here an awesome whimsy wednesday - I need to remember this during times like this. Little pitty parties I like to throw when I am not feeling my best and can't get all my work done. It will be okay....I need to be kind to myself - I AM ONLY ONE PERSON! Thanks to everyone for understand my slow start to the year. Hope this inspires you to be good to yourself.

Thursday, January 19, 2012

Valentine's Day Wreath

Hello friends, family and fans!
I hope your new year is starting off wonderfully. So far my new year has been great. I have been taking a MUCH needed break and trying to rest before customs are back in business on February 1st. Apparently I worked too hard over the holidays (which I feel very fortunate for even though I was exhausted) and pinched a nerve in my shoulder. So now I am forced to relax while I take meds, rest, ice and PRAY that it gets better soon. In the meantime I have made this lovely wreath and decided to post a tutorial for all of you to make your own. Enjoy and make sure you email me (tobi@iveyhandcrafted.com) with your finished projects or post them on my facebook wall
Tools Needed:

1: Yo Yo Makers - found here
2 & 4: 14 inch straw wreath (you can pick any size) - found here
3: embroidery thread
5: your favorite buttons
6: felt in several colors
7: your choice of fabric
8: yarn in your color choice - I bought these here

not pictured - sharp scissors, needle, glue gun
1st Step:
wrap your wreath - take a seat on the couch in front of your favorite tv show, this can take a while ;)
DO NOT TAKE OFF THE PLASTIC WRAP! Makes the process easier and cleaner.
1. begin by tying off your starting point
2. wrap with first color skipping an even amount for next color
3. wrap with second color, tie off on the back
2nd step:
Make your yo yo's! If you haven't made yo yo's before.....be ready to be addicted. I discovered these handy little yo yo makers on my craft retreat and have NEVER looked back. There are fantastic step by step instructions here or if you want to do it the old fashion way here

Here are a few photos to show you how easy it is!
Make your felt flowers
I have been seeing these everywhere and wanted to learn how to make them myself for fun projects. Little did I know just how easy they were!

Step by step:
cut a long strip of felt and fold in half
1. snip with very sharp scissors on the folded side - don't cut all the way to the end, leave room to glue or sew
2. Fold over one end and continue to wrap around till you have wrapped the whole strip into a circle
3. To finish - many people use a glue gun - but I find it easier to just stitch through to attach together.
4. turn over and fluff - you have a fun fringy felt flower!
Next step - gather all your yo yo's & felt flowers. I actually pinned all mine on first to see how they all worked together. This is a great way to see how your wreath will look before you glue them on.

Finally - glue your flowers on - I did mine all in a cluster on one side and love how it turned out. The wreath is easy to hang from the wrapped yarn on the back. Or for more detail tie another piece of yarn and tie around the top to make a hanger.
Final Product - a pretty new wreath for Valentine's day or any day of the year.
Here is the final product hung and ready to welcome my friends.